PART 6
PRINTERS AND PLOTTERSContents:
Printers and Plotters - Overview ---- Adding Printers and Plotters ---- Configuring Printers and Plotters ---- Sharing the pc3's for Workstations on a Network
| Architectural
Desktop 3 - Deployment eGuide PART 6 PRINTERS AND PLOTTERSContents: Printers and Plotters - Overview ---- Adding Printers and Plotters ---- Configuring Printers and Plotters ---- Sharing the pc3's for Workstations on a Network |
| 1Printers and Plotters - Overview | 1-6 PRINTERS AND PLOTTERS | ||||||||
| Printer
Configuration Overview Dealing with Printers and Plotters on a Networked installation of Architectural Desktop and AutoCAD can become rather complex; particularly when multiple Operating Systems are involved. In short, each workstation should read any and all system printers and one would think that thus the problem of configuring printers for AutoCAD and Architectural Desktop is as simple as doing it for Word or other software but because printer configuration information is stored with each tab of each drawing, paths and names introduce complexity. The most serious problems come from using different operating systems that use different printer and plotter drivers. Before digging into the most difficult aspect of configuring AutoCAD and Architectural Desktop Printers for a Networked environment, we should go over the basics of configuring one station.
|
|
||||||||
| 2Adding Printers and Plotters | 2-6 PRINTERS AND PLOTTERS | ||||||||
The Default
Printer Configurations (.pc3)
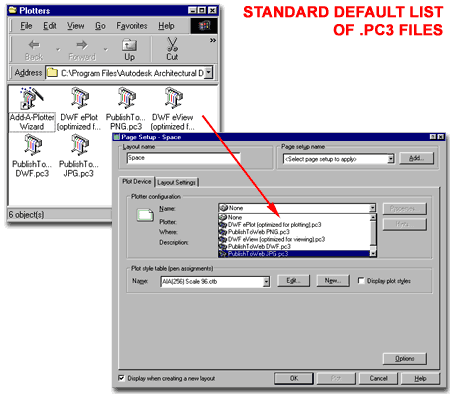
AutoCAD and Architectural Desktop both come with a set of default .pc3 files that you will only find within the Plotter Manager Window and on the Plot Device drop-down lists of the Page Setup and Plot dialog boxes. The DWF and PublishToWeb .pc3 configurations are essentially virtual printers that only work for this software and only produce files instead of output to actual printers or plotters. The decision to keep any of these in the Server Side Plotter folder should be made with some consideration.
The antithesis of this scenario is to simply create a custom configuration for any system printer that provides the right options users need on a regular basis and then save this configuration as a .pc3. Pc3 files simply point to the real system printer but contain specific driver configurations. Though these settings could be set on the default system printer, several versions offering different options would be rather difficult to achieve. |
 |
||||||||
Adding
System Printers to the Local Workstation
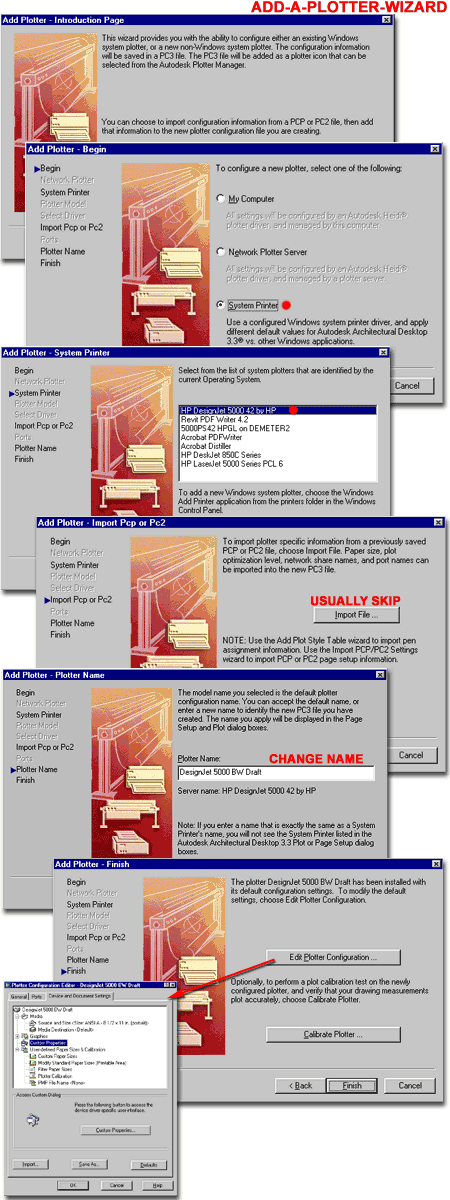
The best way to configure a printer(s) or plotters for AutoCAD and Architectural Desktop is to first Add the printer at the Local System Level and then use this printer driver to create a custom .pc3 file for AutoCAD or Architectural Desktop. The idea is to let the local system driver manage the printing and network pathing while the software simply passes it off with unique options. Illustrated to the right I show two routes a CAD or IT Manager can take to create a custom .pc3 file for AutoCAD or Architectural Desktop. The first route is to activate the Plotter Manager from with the software or by using Explorer to find the Plotters folder where in the Add-A-Plotter Wizard icon should be found ( see illustration, right ). The second route is to pick a Layout tab in any drawing file, activate the Page Setup dialog box, set the system printer on the Device Name drop-down list and use the Properties... button to access the Plotter Configuration Editor dialog box ( see illustration, lower right - labeled as "Alternate Route". |
 |
||||||||
| Add-A-Plotter-Wizard If you choose to use the Add-A-Plotter-Wizard as discussed above, I have illustrated all of the basic steps required to get through this beast. As you can see, the steps are lengthy; whereas the steps required to achieve the same results using the "Alternate Route", also discussed above, is a lot faster. The Key step is to use the System Printer radio button so you don't get caught using an old Heidi driver as in the past for AutoCAD R14 and back. Keep in mind, despite the misleading "Network Plotter Server" option, that the System Printer is a Network Printer because it is set to point to the Network Location. Once you have Selected the System Printer, you will be offered an option to Import File from older Printer and Plotter PCP's or PC2's but I have found that the results of this step are usually too poor to be of significant value. Despite my personal attitude towards this option you may want to try it out and see if the information that comes through is okay for your office needs. For the Plotter Name, you should now consider how you will configure this unique .pc3 file for general office use. One of the most common desires in architecture is to have a print that is all Black and White ( with Grayscales ) done in high-speed "Draft Mode". I term this the production printer setting and thus label the .pc3 with a name that reflects this use; e.g., "DesignJet 5000 BW Draft". You may later create one for High Quality and one for Color output. The final step involves using the Plotter Configuration Editor to create the specific plotter driver settings that match the new name just assigned in the previous step. Though you can come back and use the Calibrate Plotter... button to correct any margin problems you may experience with plots, I will skip this part for now. Generally I have not found any need to change these settings but have seen many CAD and IT Managers use this to correct problems. I believe any margin problems can be corrected on the Plotter Configuration Editor but there are a lot of Printers and Plotters out there so you may want to keep this option in mind. For information on the Plotter Configuration Editor, read below and then when you return to the Add Plotter - Finish dialog box, select the Finish button to complete the steps for creating a custom .pc3 file. |
 |
||||||||
| 3Configuring Printers and Plotters (.pc3) | 3-6 PRINTERS AND PLOTTERS | ||||||||
Plotter Configuration Properties
By default, you should find that all of the System Printers you have on your computer show up on the Name drop-down list for Plotter configurations. You may also notice that in this list there are a few .pc3 plotter names such as "PublishToWeb DWF.pc3". The .pc3 plotter names represent plotters or printers that are unique to AutoCAD/ Architectural Desktop and thus may not have anything to do with your System Printers. In the case of System Printers though, you will probably want to make changes to the default offerings so that it is more efficient to use when printing from AutoCAD or Architectural Desktop. Illustrated below, right I show a classic case of how filtering paper sizes can expedite the process of choosing paper sizes on the Layout Settings tab of the Page Setup and Plot dialogue boxes. To make changes to the System Printer settings, you must first set this printer current and then use the Properties... button to access the "Plotter Configuration Editor" dialogue box - as illustrated to the right. From this dialogue box, you can make a multitude of unique setting changes that include most of the System Printer settings as well ( see Custom Properties... button, illustrated to the right ). By having all of these options as unique configurations ( .pc3's ) you can set up your printing or plotting devices to maximize their capabilities as required by various jobs and printing needs. You can, for example, create one .pc3 that tells the plotter to produce drawings in "Draft" mode while another .pc3, for the same plotting device, is set to produce high quality color output. |
 |
||||||||
| Plotter Configuration Properties - Filtering Paper Sizes Illustrated to the right I show one of the more common Plotter Configuration settings that I make for clients: Filter Paper Sizes. If you find that there are simply too many paper size options on the Paper size drop-down list on the Layout Settings tab of the Page Setup or Plot dialogue boxes, you can remove them to make selecting paper sizes faster and easier.
|
 |
||||||||
Plotter Configuration Properties - Saving Changes ( .pc3 )
Once you have made the slightest setting change to a System Printer Configuration, these unique settings must be saved as a .pc3 file. You cannot escape this and thus you can either use the Save As... button or the OK button to receive a dialogue box in which you must specify the Name of this unique Plotter Configuration.
Also, in a networked environment all of these .pc3 files should reside in one folder location on the server. In offices using a mixture of Operating Systems and different System Plotter Drivers, you will need to create separate .pc3 files but by using the exact same names for all systems, no one in the office will know the difference. This means that you will need separate .pc3 folders for each OS and configure each AutoCAD or Architectural Desktop appropriately for the OS they have been installed on. |
 |
||||||||
Plotter Configuration Properties - Saving Changes ( .pmp )
Plot Model Parameter file stores custom paper sizes and plotter calibration information. By default, AutoCAD and Architectural desktop stores these files in the Drv ( Driver ) folder which, in my opinion, is really crazy. Since this file is crucial to maintaining a proper custom .pc3, I redirect the path for the .pmp files to the same folder where I store my .pc3 information. This way, I can track the .pc3 and .pmp files at the same time from the same folder. To change the default location of .pmp files, use the Files tab of the Options dialogue box and change the path for "Printer Description File Search Path" under the Printer Support File Path category.
|
 |
||||||||
|
|
|||||||||
| 4Sharing the .pc3's for Workstations on a Network | 4-6 PRINTERS AND PLOTTERS | ||||||||
Network
Folder Structure for one Operating System
|
|
||||||||
Network
Folder Structure for several Operating Systems
|
 |
||||||||
| 5Other information | 5-6 PRINTERS AND PLOTTERS | ||||||||
| XX
|
© Copyright 2002 ARCHIdigm. All rights reserved.
spell checked on Oct. 19, 2002 (gr)

 On a typical local workstation installation of AutoCAD and Architectural
Desktop, all system printers should show up and be accessible from the Page Setup and Plot
dialog boxes but using these default system printer configurations may prove to be
incredibly unproductive. One of the most common examples of how using the default
system printer configurations can be unproductive has to do with Paper Sizes. In
most cases, the standard architectural paper sizes are either difficult to find or not
listed and thus users have to wade through numerous steps to make the best of this awkward
situation.
On a typical local workstation installation of AutoCAD and Architectural
Desktop, all system printers should show up and be accessible from the Page Setup and Plot
dialog boxes but using these default system printer configurations may prove to be
incredibly unproductive. One of the most common examples of how using the default
system printer configurations can be unproductive has to do with Paper Sizes. In
most cases, the standard architectural paper sizes are either difficult to find or not
listed and thus users have to wade through numerous steps to make the best of this awkward
situation. Among
the many irritating problems architectural designers face with the Paper Sizes is that
either the normal set is not listed or many are missing. All plotters that I have
configured have some form of Paper Size adjustment list where you can set the Standard
paper sizes, as illustrated to the left. By unchecking non-architectural paper sizes
such as ANSI and JIS, you can improve the list offered on the Page Setup and Plot dialogue
boxes. Note: This is usually an option found on the Custom
Properties... of the printer or plotter that you have.
Among
the many irritating problems architectural designers face with the Paper Sizes is that
either the normal set is not listed or many are missing. All plotters that I have
configured have some form of Paper Size adjustment list where you can set the Standard
paper sizes, as illustrated to the left. By unchecking non-architectural paper sizes
such as ANSI and JIS, you can improve the list offered on the Page Setup and Plot dialogue
boxes. Note: This is usually an option found on the Custom
Properties... of the printer or plotter that you have. In an ideal office environment, there would be no System Printers available on
the Plot Device drop-down list but simply a list of very specific .pc3 files that offer
the right settings to produce the right output on a regular basis without any fuss for the
end user. To make this "ideal" setup even better, a CAD manager or IT
person can use the "Hide system printers" checkbox on the Plotting tab of the
Options dialogue box to prevent accidental use of a default System Printer configuration.
In an ideal office environment, there would be no System Printers available on
the Plot Device drop-down list but simply a list of very specific .pc3 files that offer
the right settings to produce the right output on a regular basis without any fuss for the
end user. To make this "ideal" setup even better, a CAD manager or IT
person can use the "Hide system printers" checkbox on the Plotting tab of the
Options dialogue box to prevent accidental use of a default System Printer configuration. The only difference between a Network Printer for one Workstation and that
for many is the location of the .pc3 file. By keeping the .pc3 files on the server,
all workstations will be able to use and read that file. Any changes to the .pc3
files will thus automatically be changed for all of the workstations. Now the only
catch in this simple solution is that all of the workstations that share a common set of
.pc3 files must also share the same Operating System.
The only difference between a Network Printer for one Workstation and that
for many is the location of the .pc3 file. By keeping the .pc3 files on the server,
all workstations will be able to use and read that file. Any changes to the .pc3
files will thus automatically be changed for all of the workstations. Now the only
catch in this simple solution is that all of the workstations that share a common set of
.pc3 files must also share the same Operating System. If there are Workstations within your AutoCAD or Architectural Desktop
Network that use different Operating Systems, like Windows 98 and Windows 2000, you will
not only need to create separate .pc3 files for each OS but separate .arg (Profiles) that
point to these .pc3 files. The cause of this problem is the different drivers and
the magic to making it work is to use the exact same .pc3 filenames even though the
drivers are different. By doing this, users will be able to pass drawing files
around and plot them without having to constantly battle Page Setup settings.
If there are Workstations within your AutoCAD or Architectural Desktop
Network that use different Operating Systems, like Windows 98 and Windows 2000, you will
not only need to create separate .pc3 files for each OS but separate .arg (Profiles) that
point to these .pc3 files. The cause of this problem is the different drivers and
the magic to making it work is to use the exact same .pc3 filenames even though the
drivers are different. By doing this, users will be able to pass drawing files
around and plot them without having to constantly battle Page Setup settings.