Shortly after AutoCAD Architecture 2011 was released, I wrote a basic review to cover some of the major changes that occurred; see AutoCAD® Architecture 2011 - First Impressions. In this review I will focus on some of the more significant changes that occurred in the Rendering section of AutoCAD and AutoCAD Architecture 2011.
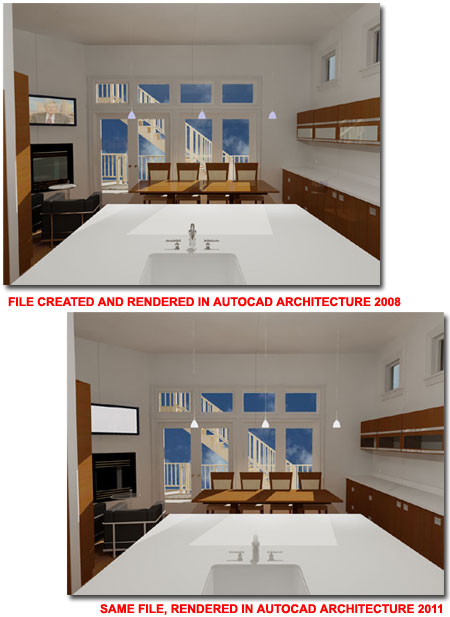
In the illustrations to the right I show a kitchen I created with AutoCAD Architecture 2008 and then rendered at a resolution of 1024x768. In the illustration, below right, I show what the same file looks like when rendered, unaltered, in AutoCAD Architecture 2011. It may be difficult to see the differences due to the reductions I made but the two things that caught my eye immediately were that the chrome faucet was no longer chrome and that the upper cabinet glass changed dramatically. The missing television image is an even bigger nightmare to discuss.
The main point of making the comparison between these two renderings is to show that significant changes occurred with respect to rendering materials. When I rendered this file in AutoCAD Architecture 2011 the rendering time was significantly faster but I suspect that had a lot to do with how some materials lost properties like "reflectivity".
Render materials, not to be confused with AutoCAD Architecture's Material Definition Styles, have been overhauled once again for the 2011 release. My main gripe with the overhauls is that Autodesk just doesn't appear to care much about naming conventions and in previous overhauls I went through hell picking up the pieces where names either had spaces, underscores or odd characters like ampersands.
In this render material overhaul Autodesk decided to place all of the rendering materials in a common folder to be shared between products like AutoCAD, AutoCAD verticals (like ACA), Inventor, Revit, 3D Studio, Alias and so on.
As far as naming goes, well, I personally feel it is an even bigger mess than ever before because now you have names like "148.png", "beechwood_chocolateBrown.png", "Masonry.Unit Masonry.Brick.Modular.Sailor.jpg" and "Sitework.Site Improvements.Fences & GatesChain-link.jpg". Once you get into the new Materials Browser, see below right, you start to see that names without spaces are nearly impossible to read because they can't wrap. This is because XML code has finally made its way into this area of these products as well.
There may be good stuff on the horizon though. On the Materials Editor materials have an information tab where you can add a description and keywords. If we can start to sort and organize based on this information, managing a large material library may get better than ever. At present, however, naming glazing rendering materials as "Clear" and "Blue" just makes it more difficult to find in a long list of in-scene materials.
For now, I will be renaming all of Autodesk's OOTB rendering materials (as I import them into scenes) with prefixes that make sense; terms like "glass", "flooring", "siding", "roofing" and so on. For AutoCAD Architecture users who tie their rendering material names to Material Definition Styles you either rely on the Content Catalog or make up your own new rules.
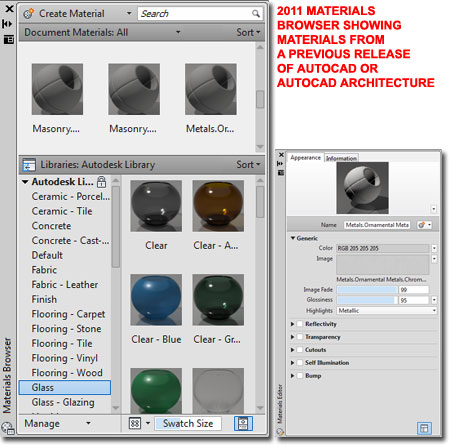
Notice that all pre-existing Rendering Materials display as monotone spheres. There is no tool to update any or all of these so you have to double-click on them to access the Materials Editor Palette where you have to make some sort of change in order to get the updated image to appear in the Materials Browser. Simply changing the Swatch Shape does the trick.
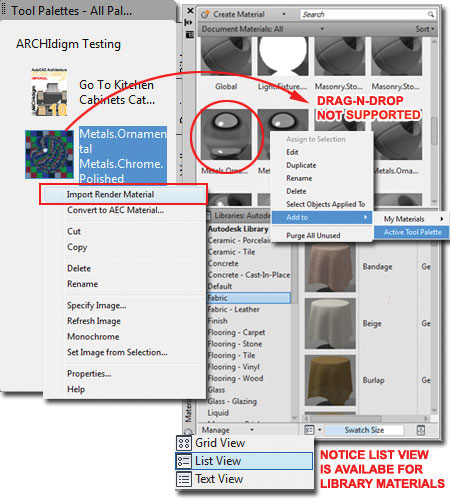
I like the new Browser but it has major flaws and the one that seems completely insane is that you cannot set the display to List or Details for in-scene materials (as in Explorer) and thus you can't read the material names unless you hold the cursor over each one. Ironically, you can set the display to List or Text View for the Library Materials.
The default Autodesk Library has a very appealing set of materials but the categorization looks so much like the material types listed on the Create Material list that it is easy to get confused. For example, I was curious about "Fabric - Leather" and thought there was a unique material type for this but as it turns out, there isn't even a Fabric material type; it's just Generic. In AutoCAD 2010 there was a Fabric Type (consistency would be nice). I would also like to recommend that the material categories have one of those cute icons Autodesk seems to love making, something like a folder, so it is clear that these are categories.
For the most part I find the new Materials Editor Palette yet another superfluous Palette in the ever expanding set of Palettes in AutoCAD and AutoCAD Architecture. It gets worse when you decide to Edit an Image and find that you now have three Palettes covering up your entire screen. I think I can see some minor benefits to having the Materials Browser and the Materials Editor as separate Palettes but it's getting pretty ridiculous when you need a third one to change Brightness, Position, Scale and Repeat values.
I would really prefer one Palette similar to the one in the 2010 release. I can accept two but would still like the option to keep material editing in one Palette; perhaps a toggle to strip editing tasks out to other Palettes could be added.
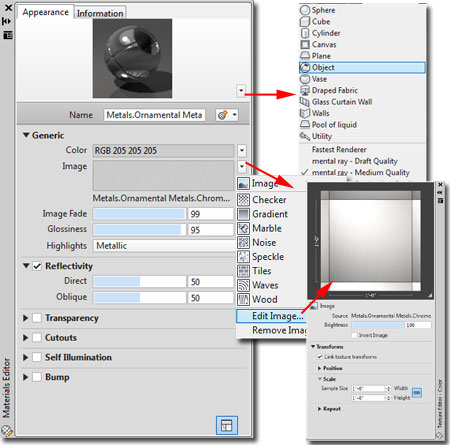
In the illustration to the right I show how an existing material, named "Metals.Ornamental Metals.Chrome.Polished" is listed as a "Generic" material type and that I had to set the "Reflectivity" option in order to see an image that even looked remotely like chrome. I also had to set the "Highlights" drop-down list to "Metallic". Adjacent to the Image Tile for this material I show that you can open a list of Swatch Types. Adjacent to the Image sample, below the Color setting, I show how you can open a list of preset patterns or go straight to "Edit Image..." option that opens the Texture Editor - Color Palette.
Note:
I am completely perplexed by the lack of a "Scaled to Fit" option on the
Texture Editor - Color Palette. The Help documentation indicates that
this option should be available. Though you can scale images with the
Gizmo, that trick doesn't work on AecObjects.
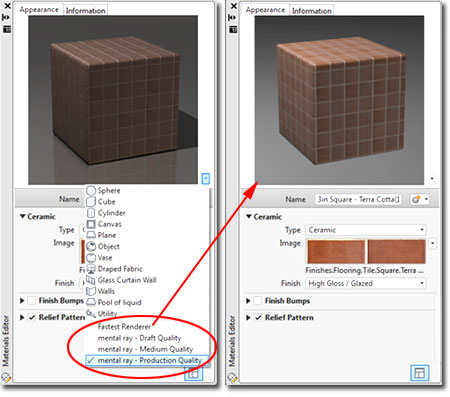
Illustrated to the right I show how the Render Quality presets affect the preview image on the Materials Editor Palette and on the preview image you will consequentially see on the Materials Browser.
I decided to show this information because of two reasons: I couldn't find a single reference to this in the Help and I, at first, assumed it had to do with the actual quality of the material mapping when rendered.
If you decide to set the preview image quality to something high, like "mental ray - Production Quality", be prepared to wait and you will need to make the preview tile large in order to get anything out of the wait. In addition, once you change the preview image quality, it affects all of the materials you decide to edit - more waiting. I'm leaving mine at "Fastest Renderer".
It seems that every time Autodesk modifies rendering and particularly render materials, AutoCAD Architecture users take a significant hit in any library work they have invested in over the years. In the past three or four releases I have seen so many screwed up things happening to render material settings that I am starting to question why I still use this product or any other Autodesk products for that matter (it's not like Revit doesn't suffer from these types of disruptions either).
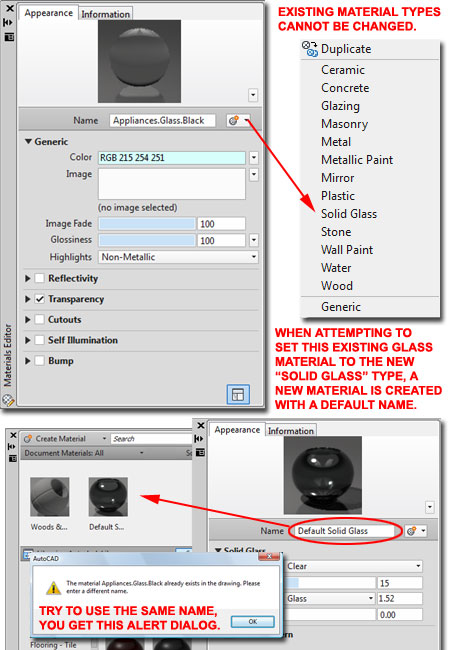
In the illustration to the right I show how an existing glazing rendering material I created in AutoCAD Architecture 2010 comes into AutoCAD Architecture 2011 as a Generic Material Type. This seems acceptable but I don't think I should have to reset the Transparency values and even if I am willing to accept that nonsense, why on earth am I forced to keep my legacy material as "Generic" when I want to take advantage of the Glazing or Solid Glass Material Types?
Even if you create a new rendering material in AutoCAD or AutoCAD Architecture 2011, you cannot change the material type after it has been created. So, if you have a groovy rendering material all set up as a Metallic Paint material type but wonder what it would look like as a Plastic material type, you can't make that change; at least not with ease.
Most programmers know that users want to change things so I figured that if you can't change the material type perhaps you can create a Duplicate or just a new one and give it the same name as a means of replacing or renaming the original. As illustrated below right, that won't work either.
The next thing I tried was to create a new material in a new drawing file and use the same name as the one in my current drawing file so I could import it and thereby override it. That trick didn't work either. The imported material name was renamed with a suffix of "(1)" and the original material was left untouched.
The final trick I used worked and it involved pushing the rendering material from a new drawing file to the current Tool Palette and then importing it from the Tool Palette to my original drawing file.
In the illustration to the right I show that I created a new rendering material in a new drawing file using the same name as the rendering material in the current drawing file. From the Material Browser, I used the Add to > Active Tool Palette context menu option to place the material on my current Tool Palette. Then, from the Tool Palette, I used the "Import Render Material" context menu option to import the render material into the current drawing file thereby overriding the render material with the same name and updating the material type.
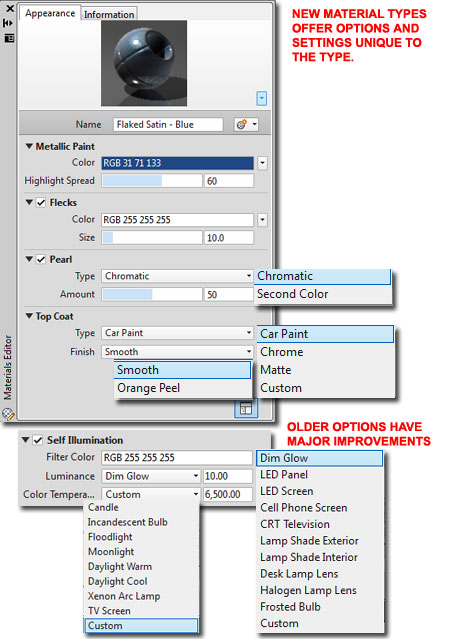
When I first took a look at the Metallic Paint options, illustrated right, I have to admit that I was stunned; Flecks, Pearl and Top Coat - are you kidding me, wow!
For other Material Types where previous options and settings still apply, you should find improvements as well. In the case of "Self Illumination", illustrated below right, notice how you can now chose values from a drop-down list for things like LED Screen.
One of the things I am most happy about is the option to type in values instead of having to use those stupid slider bars that would tend to jump across large values.
By default, custom render materials don't go anywhere other than the current drawing file. If, for example, you decide to make a new bathroom tile material based on a photo you took in a showroom the render material data resides in the current drawing and the photo of the tile remains wherever you placed it on your local system or network server. Nothing about this is any different from the past.
If you want to make your new render material accessible for use in other drawings, you can add it to the default "My Materials" Library listed at the bottom left pane of the Material Browser. You can also create a new Material Library and add Categories for better organization.
If you add your new rendering material to the "My Materials" Library file, you will find this file under the "Users" folder of on your PC. On my Vista OS (and since I am the Admin) the full path looks like this: "C:\Users\Admin\AppData\Roaming\Autodesk\ACA 2011\enu\Materials". The My Materials Library file name filename looks like this: "FavoriteMaterials.adsklib". Keep in mind that this file just contains the render material data and not the image file of the tile or whatever other image(s) you use.
A note to Autodesk:
When you work with HTML programs they usually offer an option to copy images
to the local working folder to avoid potential problems with links. It
seems to me, especially since all of this XML code is now the hot item, that
the Material Browser should offer the same option when a person drags a
custom render material from the current scene to a custom Library.
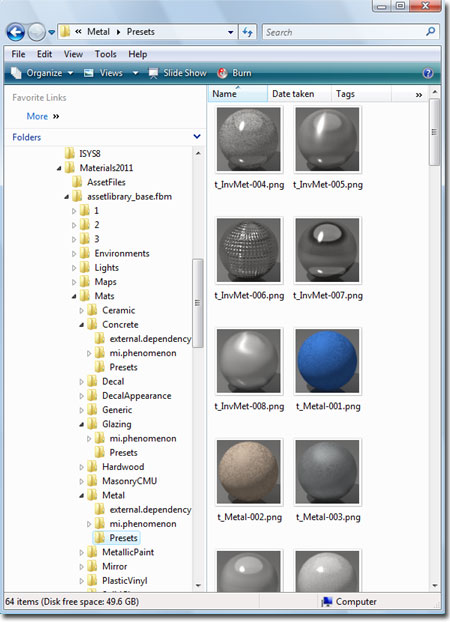
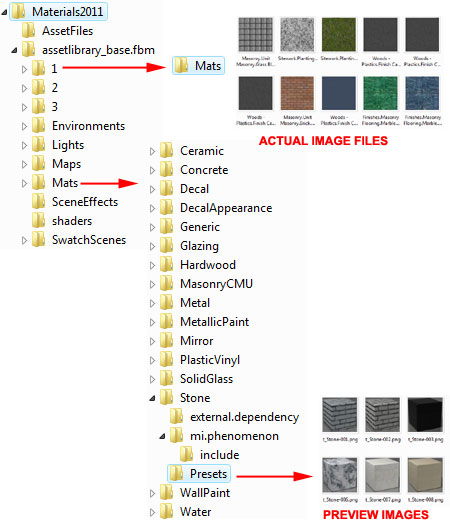
If you like to poke around your folders and try to figure out exactly where everything is for your AutoCAD or AutoCAD Architecture, you will now find the materials located in a "Common files\Autodesk Shared\Materials2011" folder. On my Vista 64 OS, this folder is located here: "C:\Program Files (x86)\Common Files\Autodesk Shared\Materials2011".
In the illustration to the right I show the new Materials2011 folder structure with a couple of examples of the sub-folder branches. I like a folder named "Environments" because it makes sense that it stores things like sky maps. I don't like folders named "1" because it doesn't say a freak'n thing to me. Under folder "1", I found a lot of familiar masonry image maps and was a little surprised to also find corresponding bump image maps; I guess they are all lumped together now.
Under the "Mats" folder I show what appears to be a more logical structuring of materials but these are just the Material Browser Categories and the images you may find within them are just the preview (.png) image tiles.
I guess that since the Material Browser handles everything for us it doesn't really matter how or where image maps are stored.
Note:
As I recall Autodesk made a pretty big deal about material improvements and
how they allowed for much higher quality rendering results. I find it
odd that nothing about this is mentioned in the "New Features Workshop" or
in the Help system.
I also find it odd that aside from carefully checking the size of the image maps in the Material Editor, I don't really know if I am selecting a material that will be more or less than needed for my rendering project.
When I first started rendering in AutoCAD Architecture 2011 I found that my system (see specs here) started locking up and eventually got to a point where it shut down with the Blue Screen of Death. The system crashes typically occurred on larger renderings and/or on repeated renderings of the same scene as I tinkered with the lights and the new materials.
I found that other people were experiencing similar problems in this thread on the Autodesk Discussion Board Autodesk Discussion Groups - The new rendering engine in 2011 is a failure, but I wasn't entirely convinced it was a software issue so I started doing some research. In the end, I found that my machine was crashing due to the heat that builds up when your CPU is running for an extended period at 100%. You can read the whole story here.
Though my system is running as good as new, it does appear that rendering changes/improvements in 2010 and 2011 have made rendering to large resolutions problematic on systems that don't have enough power to handle the load.
As critical as I have been in this article about the changes to the Render Material tools in AutoCAD and AutoCAD Architecture, I have found that the changes are providing superior rendering results. The main improvements I want are List options for the in-scene materials, a "Fit to Object' Scale option and the ability to change material types after creation.
For those of you who are trying to render work created in an earlier release of AutoCAD or AutoCAD Architecture, you may want to know about some of the new settings I found in the Help; below, quoted directly from the Help:
3DConversionMode - "Used to convert material and light definitions to the current product release"
|
Value |
Deviation Value |
|---|---|
| 0 | No material or lighting conversion takes place when the drawing is opened |
| 1 | Material and lighting conversion takes place automatically |
|
2 |
You are prompted to convert any materials or lighting. |
ConvertOldMaterials
- "Converts materials created in previous drawing file formats to the
current format".
Note:
The file I used to create the rendering comparison at the beginning of this
article had "3DConvertionMode" set to the default value of "1" and I had
even tried "ConvertOldMaterials". Perhaps these conversions work
better with 2010 files.
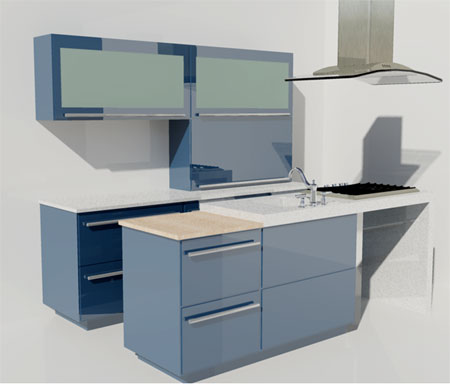
Illustrated above is a vignette based on a new plug-in we are working on for our
Kitchen Cabinets eKits product: Modern Cabinets. I wanted to see what
the cabinets would look like using the OOTB "Flaked Satin - Blue" Render
Material. I rendered this using the default Sunlight settings and the
"High" Rendering Preset.