Roof Objects in AutoCAD Architecture stink! These Objects have not evolved one iota since they were introduced in the first release of this program and everyone knows they could be better because other programs prove it (VisionREZ's Roof Object is one example). One simple improvement would be to add a feature for Adding or Subtracting vertex points.
Nathan Ellery at http://ausaca.blogspot.com/ recently sent me an e-mail asking if I knew how to add vertices to Roof Objects and I had to admit that I didn't. Nathan had discovered that if you Trim the corner of a Roof Object, you get a new vertex point. I have to admit that I was surprised that I hadn't discovered this since I usually test Trim, Extend, Break and a host of other basic AutoCAD commands on Aec Objects.
Below is a very basic overview of how this works but you can read more about on Nathan's blog.

This trick only works if you Trim off a corner of a Roof Object; i.e., you cannot draw a convenient shape into a Roof Object and Trim it out.
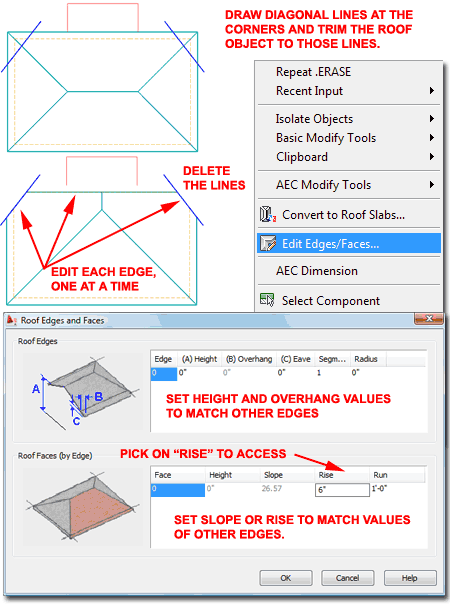
In the illustration to the right I who a simple Roof Object with Lines across two corners and a red rectangle indicating the shape I would like to include in my existing Roof Object.
When you Trim the Corner or Corners of a Roof Object, the results may vary because this work actually messes up the Roof Object's Properties by dropping the Plate Height of the affected Edges to Zero and changing the Slopes to 90 degrees. If you set the Plate Height to Zero before editing you won't have to worry about fixing this value for each affected Edge. When done, then set the Plate Height of the whole Roof Object to whatever you originally wanted.
In the lower right corner of the illustration to the right I show that I have Selected one Edge on my example Roof Object and used the Edit Edges/Faces context menu item to access the "Roof Edges and Faces" dialog. You have to do this for each edge, one at a time. I have tried to do many at once and though some changes hold, others don't (try if for yourself to confirm). On one Edge, I show that I have to set the "Overhang" and "Slope" or "Rise" values in order to fix that part of the modified Roof Object. Once you have edited each of the affected Edges, you should see that the Roof Object looks as it should but with one new Vertex at each corner that was Trimmed.

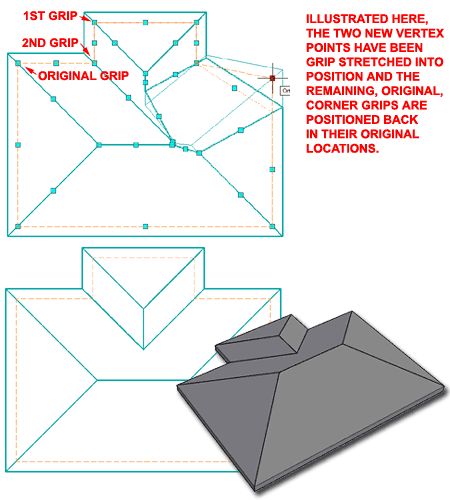
Illustrated to the right I show what my example Roof Object looks like after Editing the three affected Edges discussed above and the result of Grip Stretching those two new Vertex Points to my red rectangular outline.
To complete the work of adding the "u" shape to my Roof Object, it should be obvious that I need two more Vertex Points and thus I have to draw two new diagonal lines across the closes corners, Trim and repeat the steps discussed above.

Okay, yeah, it is a lot of work when you could just draw a new Roof Object by tracing over a new outline but if you have placed several Display Property Overrides (remember, Roof Objects don't have Styles) on your Roof Object, it may be worth the trouble. I think this was a fascinating discovery and I am glad that Nathan shared it with me.
