How do I get this toolbar?
You can also acquire access to these commands from the Desktop pull-down menu. From the Desktop pull-down menu, pick Create AEC Content..., Multi-View Blocks >, Mask Blocks >, or Profiles > and cascade to their respective command options - see image below, right.

Create AEC Content..., Multi-View Blocks, Mask Blocks, Profiles
The AEC Blocks - Profiles toolbar is comprised of several different pull-down menu items, as illustrated to the right and continues to be a collection of diverse tools that will probably evolve and expand in future releases of ADT.
With exception of the Profile tools, the rest are actually well suited to be grouped together on one toolbar because they all refer to the process of creating custom Blocks for ADT. Profiles, on the other hand, simply represent 2D outlines for use through out ADT whenever you want a unique 3D object within an existing ADT toolset. Profiles are basically an expanded form of polylines so you should already be half-way there in comprehending them.
Create AEC Content... is the most complicated routine in the bunch and usually involves Multi-View Blocks ( and at times, Mask Blocks ), so we will begin with Multi-View Blocks and then go to Mask Blocks before discussing the Create AEC Content topic.

| Menu | Desktop> Multi-View Blocks> Add Multi-View Block... |
 |
|
| Keyboard | MvBlockAdd |
| Links | Multi-View Block Styles - for how to load other mvblocks |
| Design Content - Multi-View Blocks - for an example of what a Multi-View block is and how it works. |
 The Add Multi-View Block dialogue box may be one that you
will never use since most Multi-View Blocks come in through other means, like the
DesignCenter. If you do Add Multi-View Blocks with the Add Multi-View Block dialogue
box, you risk missing out on a lot of features brought about when you drag-n-drop items
from the DesignCenter. These features are programmed into the Multi-View Blocks when
wrapped into an ADT specific bundle with the AEC Content Wizard.
The Add Multi-View Block dialogue box may be one that you
will never use since most Multi-View Blocks come in through other means, like the
DesignCenter. If you do Add Multi-View Blocks with the Add Multi-View Block dialogue
box, you risk missing out on a lot of features brought about when you drag-n-drop items
from the DesignCenter. These features are programmed into the Multi-View Blocks when
wrapped into an ADT specific bundle with the AEC Content Wizard.


Once Multi-View Blocks have been added to a drawing, you will find them on the Name drop-down list of the Add Multi-View Blocks.
Some Multi-View Blocks can be Added with a Scale of one ( 1 ) while others, usually those that are annotation types, will require a scale factor based upon your printing scale.
| Menu | Desktop> Multi-View Blocks> Modify Multi-View Block... |
|
|
| Keyboard | MvBlockModify |
| Links | Modifying Design Content - for more on the same subject |
The Modify Multi-View Block dialogue box is basically identical to the Add Multi-View dialogue box. You may find that you need to specify a Rotation angle or change the Scale a little of an inserted MvBlock but chances are that if you have gotten to this dialogue box, you are probably looking for more powerful options to change; like those found on the Properties button.
 For
Modifying Multi-View Blocks, depending on what type it is, you may find the options rather
limited. The object specific pop-up menu, illustrated to the left,
shows what few options you have. The primary Modification tool is the Modify
Multi-View Blocks dialogue box, illustrated to the right.
For
Modifying Multi-View Blocks, depending on what type it is, you may find the options rather
limited. The object specific pop-up menu, illustrated to the left,
shows what few options you have. The primary Modification tool is the Modify
Multi-View Blocks dialogue box, illustrated to the right.
On the Modify Multi-View Blocks dialogue box, you can change one Block to another on the Name pull-down menu, change the Rotation angle, modify the Scale or use the Properties button to access the Multi-View Block Reference Properties dialogue box.
![]() For more options to change, pick on the Properties
button.
For more options to change, pick on the Properties
button.

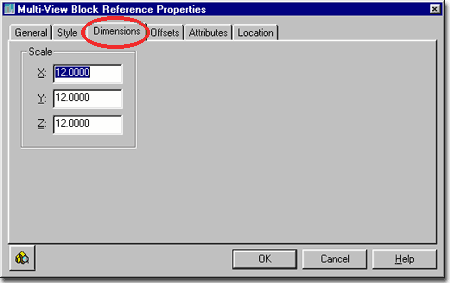
On the Dimensions tab of the Multi-View Block Reference Properties dialogue box, you will find the Scale value fields that are automatically set when you drag-n-drop a Multi-View Block into your drawing. For many objects that are Print Scale dependant, such as Tags and Electrical Symbols, the Scale value is determined by the Drawing Scale as set on the Drawing Setup dialogue box.
If you need an object to be a different dimension in Width, Depth or Height, you can change these values to match what you want. In some cases, however, this will create odd results; such as if you attempt to make a Range wider ( the burners will become ellipses ).
X - width of object
Y - depth of object
Z - height of object.
On the Offsets tab of the Multi-View Block Reference Properties dialogue box, you will find all of the individual Blocks that make up the Multi-View Block you have selected. If you have selected a complicated Multi-View Block, like a Range ( Cooker ), you may see as many as five blocks. Each Block is used for a different View orientation so you might see letters used in their names that indicate what View they are used for; such as M (Model), P (Plan), F (Front), L (Left) and R (Right).
The Offset From Insertion value fields allow you to position each of the individual Blocks uniquely within a Multi-View Block. It would be a very unusual circumstance where you would need to modify these value fields so you probably won't need to work on anything on this tab.

 On the Attributes tab of the Multi-View
Block Reference Properties dialogue box, you will find all of the individual
Blocks that make up the Multi-View Block you have selected. If there is a Prompt value
associated with any of these Block, under the View Blocks list, you can Add or Change the
text or numbers in the Value field ( as illustrated to the right ).
On the Attributes tab of the Multi-View
Block Reference Properties dialogue box, you will find all of the individual
Blocks that make up the Multi-View Block you have selected. If there is a Prompt value
associated with any of these Block, under the View Blocks list, you can Add or Change the
text or numbers in the Value field ( as illustrated to the right ).
Few, if any, of the 3D objects have options for a Prompt and Value but many of the 2D Multi-View Blocks have Value options and you can use these to Add or Change Values - as illustrated to the left.

 On the Location tab of the Multi-View Block
Reference Properties dialogue box, you will find Insertion Point value fields
that you can use to adjust the position of a Multi-View block should its default Insertion
Point prove to be undesirable.
On the Location tab of the Multi-View Block
Reference Properties dialogue box, you will find Insertion Point value fields
that you can use to adjust the position of a Multi-View block should its default Insertion
Point prove to be undesirable.
Illustrated to the left, I show how some 3D Design Content objects come in sitting on the floor plane when they should sit at a more appropriate height to match where and what they are used for. Left, I show how a common kitchen sink can be set to the correct counter top height by using the Z-axis Insertion Point value on the Location tab of the Multi-View Block Reference Properties dialogue box, illustrated right.

| Menu | Desktop> Multi-View Blocks> Multi-View Block Definitions... |
|
|
| Keyboard | MvBlockDefine |
| Links | Modifying Design Content - for more on the same subject |
Multi-View Blocks are managed by the Style Manager where, unlike most other ADT objects, you will find very little in terms of options. This is because there really isn't much to manage. What the Style Manager does, is match which blocks you want to see at certain View Directions and under certain Display Representations.
Illustrated to the right, I show the List tab of a typical ADT Multi-View object, a chair and the various Blocks that reside within the Multi-View Block. In the List, you will see the View Direction listed next to each Block Definition Name.

On the View Blocks tab of the Multi-view Block Definition Properties dialogue box, shown right, you should see why ADT's blocks show up in some views and not in others.
You should find that there are different block names for top/bottom views, front/back and left/right views. And there may also be different block names for Model and Reflected Display Representations.

In this illustration, right, I show how you can take an existing Multi-view block and change its Reflected Display Representation by Add...'ing a block and orienting it for Top display only.
If you like to show your Switch blocks on your Reflected
Ceiling Plans, as I do, you will need to make this modification to ADT's default Switch
Multi-view blocks because they  are set to not display in RCP's. By using the same block ADT
uses for plan view on the General Display Representation, you can Add it to the Reflected
Display Representation and orient it for Top View. The blocks for the various view
directions will have names that are very similar with exception of the last letter which
indicates view direction; such as "P" for Plan and "L" for Left and
Right view and "M" for Model. In the case of the dimmer switch or regular
switch you should see a block name such as "I_ELEC_SWITCH_DIMMER_P" or
"I_ELEC_SWITCH_SINGLE_POLE_P".
are set to not display in RCP's. By using the same block ADT
uses for plan view on the General Display Representation, you can Add it to the Reflected
Display Representation and orient it for Top View. The blocks for the various view
directions will have names that are very similar with exception of the last letter which
indicates view direction; such as "P" for Plan and "L" for Left and
Right view and "M" for Model. In the case of the dimmer switch or regular
switch you should see a block name such as "I_ELEC_SWITCH_DIMMER_P" or
"I_ELEC_SWITCH_SINGLE_POLE_P".
If you want to make this a permanent change for the DesignCenter, you can edit the source Multi-view block by opening it directly. It's just a drawing file residing in the folder you see in the DesignCenter. Once you have it opened, you can repeat this example and save the file. Another change you might want to make, is to Add... the 3D switch Block, from the same directory, on all your Switch Multi-view blocks.

Multi-View Blocks do not have unique Display Representation Options so you will not find anything to change on the Entity Display dialogue box. But Multi-View Blocks are controlled by Display Representations in the sense that they are either on or off.
Understanding how the Display Manager can be used to turn Multi-View Blocks on or off for certain Display Representations can be a very useful bit of knowledge; especially when caught in a pinch trying to get something like a Floor Plan out with Ceiling Fixtures included.
Illustrated to the right, I show that Multi-View Block Reference has been selected in the left pane of the Display Manager and that I have just turned on all Reflected Display Representations of Multi-View Blocks for the Plan Display Representation Set. This means that now, whenever I use a Display Configuration that uses the Plan Display Representation, I will see the Reflected view ( or Block set for use on Reflected Views) of Multi-View Blocks. In other words, all the lights just came on in normal plan view.
The drawback to this approach is that it affects all Multi-View Blocks and may end up displaying Multi-View Blocks that you don't want to see. The same problem may occur when you use this technique to turn things off.

| Download | multi-view_block_example.dwg - for all of the pieces in this example. Note: there are a few differences like the insertion points but it's very close. |
Now that you have read all about the basics behind Multi-View blocks, it's time to create your own. Before you proceed, make sure you are up on your Block making skills in AutoCAD since we have to make one Block for every view used in a drawing.
Since most of the Lavatories in ADT are simple 2D Multi-View Blocks and not 3D Multi-View Blocks, I thought this would be a good place to not only learn about making MvBlocks but also make some improvements to ADT's Design Content folder.
Since the best MvBlocks also contain a 3D block for Isometric and Perspective Views, we will also need to create one of these 3D objects. If you are not up on making 3D objects in either AutoCAD or ADT, don't worry, I have one ready for you that you can download.
To make a Multi-View Block, you first have to draw the various views of your object and then make regular AutoCAD Blocks out of them with the Make Block command. Depending upon the complexity of the object, you may need more views than those illustrated for a common lavatory, right.
For the following steps, draw as you normally would in 2D AutoCAD mode. Use Polylines, Arc, Circles, Rectangles, Lines, Plines and other 2D objects. Draw everything on Layer 0 (zero). If you are creating an actual physical object and not an annotation symbol, draw it at a scale of 1:1 ( real size, unless you are one of those clever folks who uses one block for various sizes ). For Linetypes, select an appropriate Style that would work in the finished drawing; i.e., when inserted, the Ltscale of that drawing will govern the Linetype scaling.
For the 3D Model, draw it on Layer 0 as well and consider which modeling tools to use before jumping in. ADT has 3 types of Modeling objects: Surfaces, Solids and ADT's native Facets ( also know as Masses ).

STEP 1
Draw a Top view of your
MvBlock and make a Block of it with a unique indicator in the name that refers to Top
View; something like "ObjectName_ObjectSize_T". Use a
very specific Insertion Point that will be the same in all of the other Blocks. If
this is impossible to figure out, you can make Offset adjustments later.
STEP 2
Draw a Front view of your
MvBlock and make a Block of it with a unique indicator in the name that refers to Front
View; something like "ObjectName_ObjectSize_F". If you
know that you will have different views for Front and Back, draw these and use something
like "F" and "B" for Front and Back in the Block names. Try to
use an Insertion Point similar to that selected for the Top view ( as seen from the Front
).
STEP 3
Draw a Side view of your
MvBlock and make a Block of it with a unique indicator in the name that refers to Front
View; something like "ObjectName_ObjectSize_S". If you
know that you will have different view for Left and Right, draw these and use something
like "L" and "R" for Left and Right in the Block names. Try to
use an Insertion Point similar to that selected for the Top view ( as seen from the Side
).
STEP 4
Draw a 3D Model view of your
MvBlock and make a Block of it with a unique indicator in the name that refers to Model
View; something like "ObjectName_ObjectSize_M". Try to
use an Insertion Point similar to that selected for the Top view ( as seen from an
Isometric ). We can get into a whole philosophical debate on how to best model these
objects. If you want the smallest object size, use Surfaces. If you only know
how to Mass Model ( Facet Model ), use them and if you are already a master of Solid
Modeling, well, why not use that. These things tend to get big no matter what you do
and for a Sink or Lavatory, the easiest thing is to just Solid Model it

| Menu | Desktop> Multi-View Blocks> Multi-View Block Definitions... |
|
|
| Keyboard | MvBlockDefine |
On the Style Manager Window filtered for Multi-View Block definitions, use the New button to create a New MvBlock Definition.
Highlight your new MvBlock Definition and use the Edit... button to access the Multi-View Block Definition Properties dialogue box.
On the General tab of the Multi-View Block Definition Properties dialogue box, provide a description of your cool new block.

On the View Blocks tab of the Multi-View Block Definition Properties dialogue box, select a Display Representation and use the Add... button to insert each of the Blocks created for the various views. You will need to add them on at a time, unfortunately.
Once you have Added all of the Blocks for the various views, highlight one block and assign it one or more View Directions.
Repeat this process for each Display Representation that you wish your MvBlock to display in. The most common Display Representation for general furniture and fixtures would be the General, Model and possibly Reflected Display Representations.
For General, set all View Blocks including one for Model for the Other View Directions unless you don't want it to display as a 3D object at any time unless the Model Display Representation is used.
For Model, use only the 3D Block but set it for all View Directions.
For Reflected, use any View Blocks that you have created for Reflected views or use a plan view if you want it to display in Reflected plans. Set it to Top View Direction.
For other Display Representations, you might want to use them for advanced display control. This is where you might have a full set of Mvblocks for one scale or type of output and another whole set for details. As far as I know, none of the default ADT Mvblocks have this level of sophistication built in yet but you could do it. The problem is that the more you add the more memory each Mvblock consumes. Personally, I would love a library of symbols that could match my different printing scales and know the difference between a client presentation drawing and construction documents. How about you?

| Menu | Desktop> Multi-View Blocks> Add Multi-View Block... |
|
|
| Keyboard | MvBlockAdd |
Use the Add Multi-View Block button and insert it in a blank drawing. Use the View button on the View toolbar, illustrated to the right and make sure that you see only the appropriate View Block for the various 2D viewing angles. For the Isometric Views, you should see only the 3D View Block.
If there are errors, you can go back to the Style Manager and Edit... the Definition Properties. If there are errors in any of the individual blocks, you can insert them and use the Refedit command to make the necessary corrections.

The next step is probably inevitable. This is where you want your new MvBlock to be added to the DesignCenter Content Folders and behave just like all of ADT's Mvblocks. To achieve this, you will have to use the Create AEC Content Wizard and run it through a few basic steps so that it can adopt Scaling, Layer Keying, a Name, Location and an Icon.

| Menu | Desktop> Mask Blocks> Add Mask Block... |
|
|
| Keyboard | MaskAdd |
| Links | Mask Block Styles - for how to load other mask blocks |
The Add Mask Block dialogue box may be one that you will never use since most Mask Blocks come in through other means, like the DesignCenter. If you do Add Mask Blocks with the Add Mask Block dialogue box, you risk missing out on a lot of features brought about when you drag-n-drop items from the DesignCenter. These features are programmed into the Mask Blocks when wrapped into an ADT specific bundle with the AEC Content Wizard.
Once Mask Blocks have been added to a drawing, you will find them on the Name drop-down list of the Add Mask Blocks.
Some Mask Blocks can be Added with a Scale of one ( 1 ) while others, usually those that are annotation types, will require a scale factor based upon your printing scale.
Mask Block are very similar to Multi-View Blocks so you may find this material redundant. The main difference will become apparent once you get to the Properties of a Mask Block.

| Links | Adding Ceiling Fixtures - for information on how to add ceiling fixtures like Fans and Smoke Detectors. |
| Adding Electric Fixtures - for information on how to add lights |
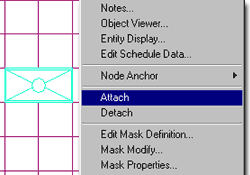
| Menu | Desktop> Mask Blocks> Attach Mask to Object |
|
|
| Keyboard | MaskAttach |
| Links | Mask Block Styles - for how to load other mask blocks |
Attaching Mask Blocks is the type of task that is almost difficult to figure out due to the absurd nature of the task itself. Though there are good reasons for why you would need the option to Select the Object(s) to be Masked, it should be done at the time of insertion or automatically mask all items below it.
 If you have had any experience with AutoCAD's DrawOrder command, you
already have a bit of the Masking concept down. With DrawOrder you can stack the
order of masking but with Mask Blocks, you have to do it by Association.
If you have had any experience with AutoCAD's DrawOrder command, you
already have a bit of the Masking concept down. With DrawOrder you can stack the
order of masking but with Mask Blocks, you have to do it by Association.
A Mask Block can mask just about anything but you will need to to the Attachment process for each object you wish to Mask; i.e. you cannot select multiple objects to be masked at once.
To Attach the Mask of a Mask Block to an object, you first have to Select the Mask Block, hit enter and then Select the object to be Masked.

| Menu | Desktop> Mask Blocks> Modify Mask Block... |
|
|
| Keyboard | MaskModify |
| Links | Modifying Design Content - for more on the same subject |
The Modify Mask Block dialogue box is basically identical to the Add Mask dialogue box and thus also the same as the Modify Multi-View dialogue box. See Modify Multi-View Block dialogue box for more.
Other
than the Attach and Detach tools, there really isn't
much more that can be Modified on Mask Blocks. Since Mask Blocks, at the simplest
level are nothing more than polylines and at the most complicated, nothing more than
polylines tied together with other ADT objects, Editing falls to either the Mask Block
Definition Styles or the other objects.

| Menu | Desktop> Mask Blocks> Mask Block Definitions... |
|
|
| Keyboard | MaskDefine |
| Links |
Once you reach the point where you are ready to create your own Mask Block Definitions, you will suddenly discover the power and value of these objects. The problem with the default set of examples in ADT is that they are simple 2D objects and when we use ADT, we are all set and ready to work in 3D.
By combining the power of the Mask Block with Multi-View Blocks, you will suddenly find a really useful tool. For furniture designers, for example, think of furniture that covers floor material, hatch patterns, text or other furniture. For designers who want rapid Wipe Out features on their labels, you can add Mask Blocks to the Multi-View Label Blocks.

Once you have created a Mask Block Definition Name, you will have to use the Set From button on the Style Manager Window to define the shape that the Mask will have. For the shape, you have to use a Closed Polyline drawn prior to getting to this point.
 Illustrated to the right, I show a common ADT object ( a Chair )
with a Polyline traced around the exterior edge. By combining a chair and a Mask, we
can look at how a Mask can be used in other situations than Ceiling Fixtures. Of
course this technique can be used in as many ways as your imagination can come up with.
Illustrated to the right, I show a common ADT object ( a Chair )
with a Polyline traced around the exterior edge. By combining a chair and a Mask, we
can look at how a Mask can be used in other situations than Ceiling Fixtures. Of
course this technique can be used in as many ways as your imagination can come up with.
For the Chair example, I have my Polyline right on top of the Chair so that can see how the Mask and Chair will relate and I find that it is easier to do it this way.
After picking the Set From button, Select the Polyline, Do not Add Another Ring, Set the Insertion Base Point to match that of the object to be included ( the Chair ) and then Select the "Addition Graphics" ( the Chair ).
| Note: Adding Rings provides you with the option to make a Mask that has a hole or alternating Masked and unMasked sections ( like a ring ). Adding Additional Graphics is not necessary but most like the way you will use Masks. All of the Ceiling Lights that have Masks, were created this way. Adding Additional Graphics simply means that you want your Mask outline with something in the place of the Mask; lines, blocks or other ADT objects. |

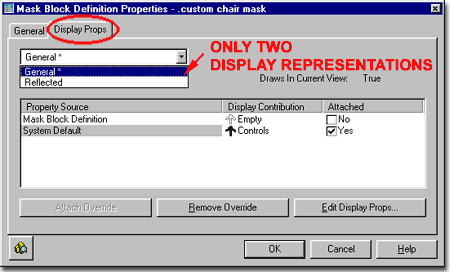
The Display Props tab on the Mask Block Definitions Style dialogue box provides access to two display characteristics on your Mask Objects: Boundary Profile and Additional Graphics. As with the Multi-View Block, discussed above, you can use the Display Manager to quickly turn on or off all Mask Blocks for General or Reflected Display Representations.
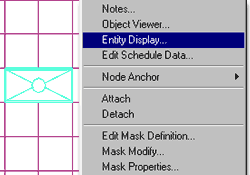 Illustrated to the left, is another way to access the Display Props
tab; select the specific object, right click
on your mouse to invoke the object-specific pop-up menu and select Entity
Display... See discussion directly below.
Illustrated to the left, is another way to access the Display Props
tab; select the specific object, right click
on your mouse to invoke the object-specific pop-up menu and select Entity
Display... See discussion directly below.

On the Display Props tab of the Mask Block Definition Properties dialogue box you should find that there are only two Display Representations to choose from: General and Reflected. If you Select Reflected, the changes you make for the Display Props will only affect the Reflected Display Representation, just like with the Fluorescent Ceiling Fixtures.
In the case of doing something different, like with the Chair example above, you would use the General Display Representation so the settings you make will affect the Plan Views.
When you are ready to go to the Edit Display Props... button, you will have to decide on which Property Source you want to modify. For a custom object like that in this example, you will most likely want to use the Mask Block Definition Property Source rather than the System Default.
On the Layer / Color / Linetype tab of the Entity Properties dialogue box you should find that there are only two Components to a Mask object: Boundary Profile and Additional Graphics.
 Boundary Profile - this is the
actual Mask edge or edges if you Added Rings. Generally, you don't want the
Boundaries if you are using Graphics with your Mask but if you are using the Mask alone as
an object in itself, you will probably want that outline so you can work with it.
For the ADT Ceiling Fixtures, they use the Mask outline as part of the fixture graphics so
this is another case where you will want it on.
Boundary Profile - this is the
actual Mask edge or edges if you Added Rings. Generally, you don't want the
Boundaries if you are using Graphics with your Mask but if you are using the Mask alone as
an object in itself, you will probably want that outline so you can work with it.
For the ADT Ceiling Fixtures, they use the Mask outline as part of the fixture graphics so
this is another case where you will want it on.
Additional Graphics - this option is only valid if you selected additional graphics when you created your Mask. The option is interesting because on objects, like some of the ceiling fixtures, you can turn off the symbolism leaving only the Mask outline.

| Menu | Desktop> Create AEC Content... |
|
|
| Keyboard | CreateContent |
| Links |
The Create AEC Content Wizard is probably the most significant tool in all of ADT for creating custom content. This is where you get to make Blocks, Multi-View Blocks, Masking Blocks and Custom Command sequences all follow certain ADT based guidelines like Layer Keying and Drawing Scale sizing.
Every time you drag-n-drop an ADT object from the DesignCenter that object has certain rules that it abides by which are all controlled through the Content Wizard. If you highlight an ADT object in the DesignCenter, right-click and Select Edit... from the pop-up menu, you will get this Wizard as your tool to Edit that object.
Though it may appear as a complex set of steps, once you run one object through this Wizard you should find that it is basically the same routine for all content you want to make. To become familiar with all of the options, lets start by looking at running a typical AutoCAD Block through the Create AEC Content Wizard and see what a smart ADT Block we can make of it.

STEP 1
There are basically 3 steps
required to run any Content Type through the AEC Content Wizard. Illustrated to the
right and immediately below, we will go through the 3 steps required to run an old 2D
block from an old office library through the AEC Content Wizard so that we can update it
with Layer Keying and add it to the DesignCenter's Content Library.
In the first phase of converting an old block to an ADT Block, you will need to Start a New Drawing from scratch and insert the old Block. Then, you should use the Zoom command to maximize ( Extents ) the Block on the screen and center it ( Pan ) as illustrated to the right.
In order to get a nice clean image in the DesignCenter, it seems to work best to set the background color to White. This can be done by using the Options ( type "OP" ) dialogue box, go to the Display tab and use the Colors button.
Activate the Create AEC Content Wizard and set the Content Type to Block.
On the Current Drawing list, select the Block Name you just inserted and use the Add>>> button to bring it over to the Content File list.
Use the Next> button to proceed to Step 2.

STEP
2
In the second phase of converting an old block
to an ADT Block, you will need to look over all of the Insert Options and decide on how
you want your ADT Block to behave once it is inserted ( or drag-n-dropped ). For
this example, it is really simple because we basically want all of the default settings:
Explode on Insert unchecked
Preset Elevation set to 0
Anchor Type set to None
Scale for X,Y and Z
set to 1
Additional Scaling set to None
Enable AEC Unit Scaling unchecked
Attributes are Not Applicable
here
Layer Key is the real reason we are on this dialogue box and going through most of this work. Use the Select Layer Key... button to access the Select Layer Key dialogue box and select an appropriate Layer Key to assign to your ADT Block. In the case of this Toilet example, I will have ADT place it on the same layer as with other similar blocks; the PFIXT Layer Key which is the default AIA Layer for A-Flor-Pfix.
If you don't see any Layer Keys, exit the AEC Content Wizard and Set A Layer Standard. Then load the AEC Content Wizard again and go through these steps once more.

STEP 3
In the final phase of converting an old block to an ADT Block,
you will need to use the Browse... button to Locate and Name
your new ADT Block. Though you do not have to use any of the ADT Folders, it helps
to add content within the existing structure so that is why I show the example Toilet
block being added to the Toilet Folder.
See Part 16 - Design Content for a listing of all the ADT Content Folder locations.
C:\Program Files\\AutoCAD Architectural Desktop
3\Content\Imperial\
C:\Program Files\\AutoCAD Architectural Desktop 3\Content\Metric\
Once you have Located and Named your ADT Block, you can use the Default Icon... button to reset the Icon to match your current Screen Display. This is why we started this process with the Block set to a Zoom Extents and with a White Background.
For the Detailed Description, you can add information that
will be seen in the DesignCenter in the Description Pane.
Save Preview Graphics should be checked so that you have this image for your DesignCenter.
When you have Finished all of these steps, you should be able to see and use your new ADT Block from the DesignCenter as illustrated to the left. When you drag-n-drop the new block, it should automatically Key to the correct Layer as with all other ADT content.

| Menu | Desktop> Profiles> Profile Definitions... |
|
|
| Keyboard | ProfileDefine |
| Links | Profiling your own Mass Shapes - for more examples on how to use a Profile on the Add Mass Element dialogue box. |
For Profile objects, you can use the Style Manager to load, modify, delete and create new Profile Styles ( or Definitions, if you want the Autodesk term ) much like all of the other ADT object Styles. With Profiles, however, you will not find an extensive library drawing file since these are used to solve that very problem; when Styles don't have the right shape.
 If you
want a library of common Profiles, create them in a blank drawing and save it to a logical
location like the Styles folder in the Architectural Desktop directory. Or, create a
new folder under Imperial or Metric called "Profiles".
If you
want a library of common Profiles, create them in a blank drawing and save it to a logical
location like the Styles folder in the Architectural Desktop directory. Or, create a
new folder under Imperial or Metric called "Profiles".
Illustrated to the right, I show the process of creating a New Profile Style that I have Named "Custom Profile Example". By double-clicking on this new style, you will invoke the Profile Definition Properties dialogue box - as illustrated.
The General tab provides access to the Name and Description fields for a Style; plus access to the attachment of Notes and Property Sets. There is nothing else to change on the Profile Definition Properties dialogue box and you don't actually need to use it when you create a Profile. It's the Set From option that's important!

The key to creating a Profile is using the Set From button on the Style Manager window. You can also access this option from the right-click pop-up menu, as illustrated to the right.
Once you have selected the Set From option, you will need to select a Closed Polyline shape somewhere in your drawing. Once you have selected a closed pline object, you will be prompted, on the command line, to "Add another ring?[Yes/No]"; which refers to internal holes.
The last question will be about "Insertion Point or <Centroid>", which allows you to OSNAP to an insertion point or allow the default option to calculate an absolute middle. Insertion point is really a matter of how you want your object that uses this profile to behave. With Mass Elements, for example, many of the pre-defined shapes have an insertion point based upon their Centroid. You can actually OSNAP to this Centroid using the NODE OSNAP, so it can be handy to use Centroid.
Command: profile
Profile [as Pline/Definitions]: d
Select a closed polyline:
Add another ring? [Yes/No] <N>:
Insertion Point or <Centroid>:
Profile [as Pline/Definitions]:
Command:
Note:
In most cases, the layer and the size of the closed pline object does not matter when you
create it since most ADT objects are automatically keyed to a layer and offer options for
controlling the actual dimensional proportions of your profile. In other words, if
you are in a hurry, you can be pretty sloppy; just get the dimensional proportions/ratios
right.
You can change a Profile anything by using the Set From option and selecting another closed pline object. Doing this will change all objects, in the current drawing, that are using this Profile Definition.

Illustrated to the right, I show the Add Mass Element
dialogue box with the Shape set  to Extrusion. By using a
Shape of either Extrusion or Revolution, you are allowed
to select a unique Profile - as illustrated.
to Extrusion. By using a
Shape of either Extrusion or Revolution, you are allowed
to select a unique Profile - as illustrated.
Once a unique Profile has been set, you can use any available size fields to control the proportions of your object or simply use the Specify on Screen option.

| Menu | Desktop> Profiles> Insert Profile as Polyline... |
|
|
| Keyboard | ProfileAsPolyline |
| Links |
There a two times that regularly come up where I want to Insert a Profile as a Polyline; one is when I want to change the original shape for all existing objects that currently use it and the other is for when I want the shape as the basis for making another object or Profile.
If you want to use your inserted Profile as a Polyline again, you will need to go back to the Profile Define button and use the Set From option. You can use this technique to create a New Profile or Redefine an Existing Profile.

| Menu | Desktop> Profiles> Convert Polyline to Profile Definition |
| N.A. | |
| Keyboard | ConvertPlineToProfileDef |
| Links |
 The Convert Polyline to Profile
Definition tool is basically a short-cut for using the Style Manager
to achieve the same results - as illustrated to the right. Since so many of ADT's
objects allow for the use of Profiles, anything that shortens the process is a very
welcome option.
The Convert Polyline to Profile
Definition tool is basically a short-cut for using the Style Manager
to achieve the same results - as illustrated to the right. Since so many of ADT's
objects allow for the use of Profiles, anything that shortens the process is a very
welcome option.
Command line sequence:
Command: ConvertPlineToProfileDef
Insertion point or [Add ring/Centroid]: <specify insertion point or type
"A" to Add voids>
Select a closed polyline: <select a closed Pline to become a Void (by default)
>
Insertion point or [Add ring/Centroid]: <continue the process of
Adding Voids or specify an insertion point>
Profile Definition [New/Existing] <New>: < type "N" to create a
New Profile Definition Style Name or "E" to select from a list of existing
Profile Definition Style Names >

Note:
Read up on the whole Profile story, above, for information on how to use Profiles, how to
edit them and so forth.